
We had so much fun making this DIY Christmas Wreath from pasta, we had to share. Sure, traditional Christmas wreaths are beautiful but this year, why not mix it up and try something different? This wreath is fun for all ages and brings together creativity, affordability, and a dash of nostalgia to put you in the Christmas spirit!
The Appeal of DIY Christmas Wreaths
There’s a certain charm in DIY Christmas wreaths that sets them apart from store-bought ones. Besides being fun, crafting your own Christmas wreath adds a personal touch to your holiday decor and when you look at it in years to come you will remember the memories around creating it! It’s not just an ornament.
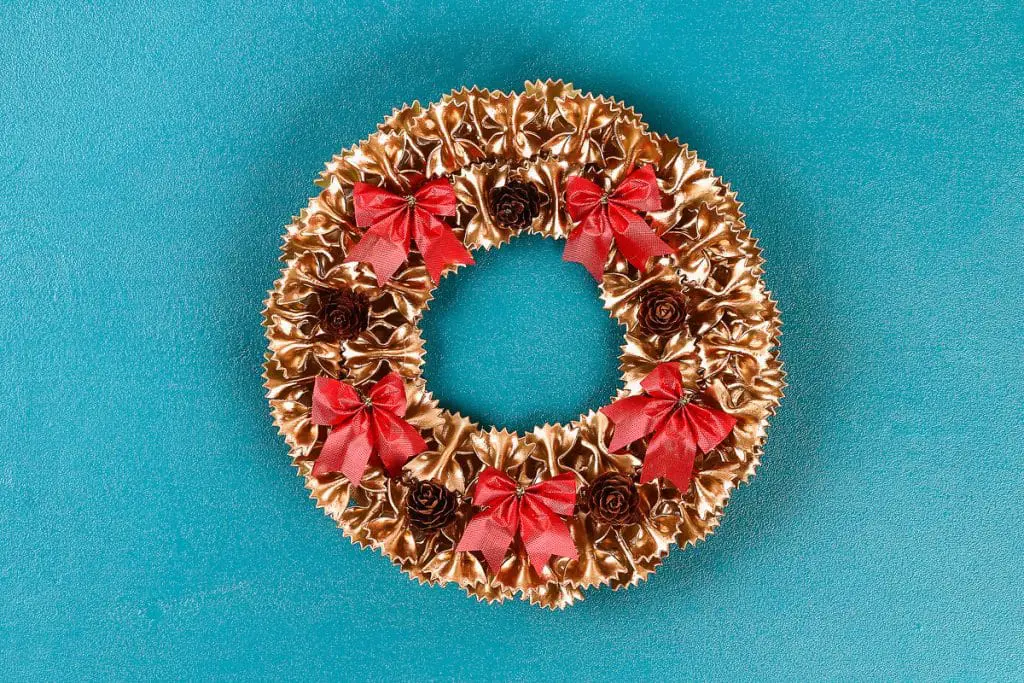
Incorporating unconventional materials like farfalle pasta in wreath-making adds a unique and creative element to the traditional Christmas wreath. The distinctive bow-tie shape of farfalle pasta, reminiscent of a festive bow or a gift waiting to be unwrapped, brings a playful vibe to the wreath. It adds an element of surprise and whimsy to your holiday decor, setting it apart from the usual decorations. This unexpected choice of material transforms a simple pasta into a beautiful decoration, capturing the essence of the festive season in a unique way.
Farfalle pasta wreaths are not just visually appealing; they are also an affordable and simple DIY project that anyone can undertake. With a few basic materials and a sprinkle of creativity, you can create a stunning wreath that adds a festive charm to your home without burning a hole in your pocket. It’s a testament to the fact that you don’t need to splurge on expensive decorations to create a festive ambiance; all you need is a creative idea and the will to bring it to life.
Why a Pasta Wreath?
A farfalle pasta wreath is an unexpected yet delightful addition to your holiday decor. While traditional Christmas wreaths usually feature green foliage, berries, and festive ornaments, a farfalle wreath breaks the convention with its unique design and playful vibe. It’s a charming, whimsical, and fun alternative that adds a touch of creativity and personality to your holiday decor.
The bow-tie shape of farfalle pasta is perfect for crafting a festive wreath. Each piece of pasta resembles a miniature bow, adding a playful and festive touch to the wreath. Arranging these pasta pieces around a wreath form creates a visually appealing pattern that captures the eye and sparks interest. It’s a delightful twist on the traditional wreath that’s sure to bring a smile to your face every time you see it.
Crafting a farfalle wreath is not just about creating an ornament; it’s also about exploring your creativity and personalizing your holiday decor. The process allows you to experiment with different designs, color schemes, and decorative elements, creating a wreath that truly reflects your style and aesthetic sense. With a farfalle wreath, you can create a festive ambiance that’s unique, personal, and filled with the spirit of the season.
Materials Needed
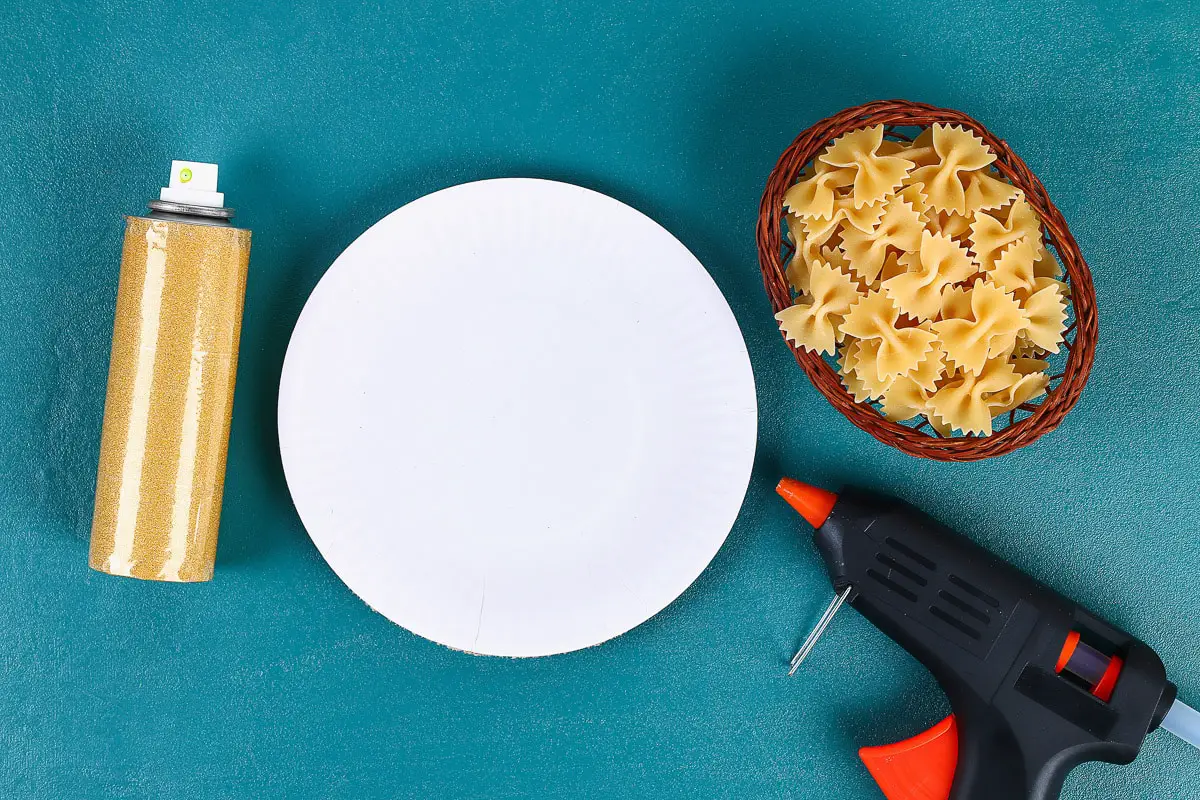
To start crafting your farfalle pasta wreath, you’ll need to gather a few essential materials. These include:
- Dried farfalle pasta (also known as bow-tie pasta): The star of the show, farfalle pasta, is easily available in any grocery store.
- Hot glue gun: You can use regular glue but hot glue holds best.
- Paper plate
- Green or Gold Spray paint: This will serve as the base color for your wreath.
- Red spray paint: This will be for the finishing touches of red ribbons.
- Additional materials: Consider incorporating other decorative elements such as ribbon, ornaments, and acrylic paints to personalize and embellish your wreath.
Creating the Wreath Base
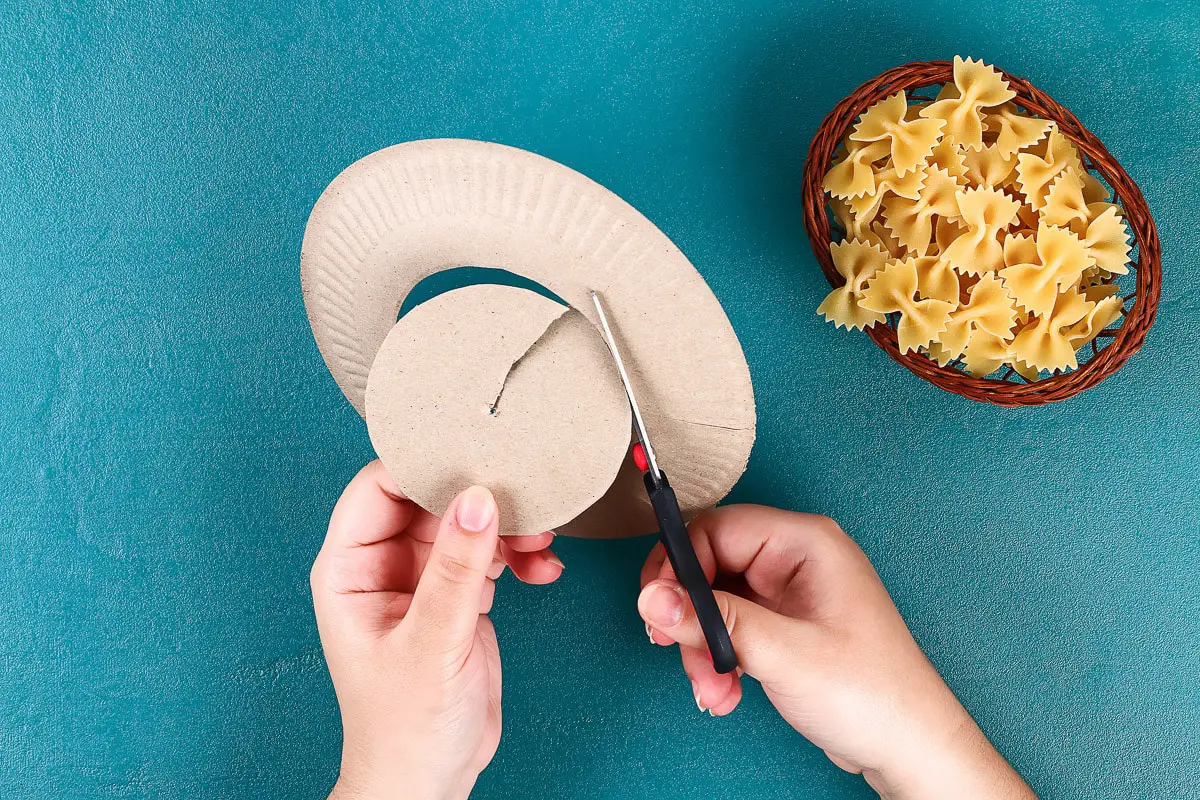
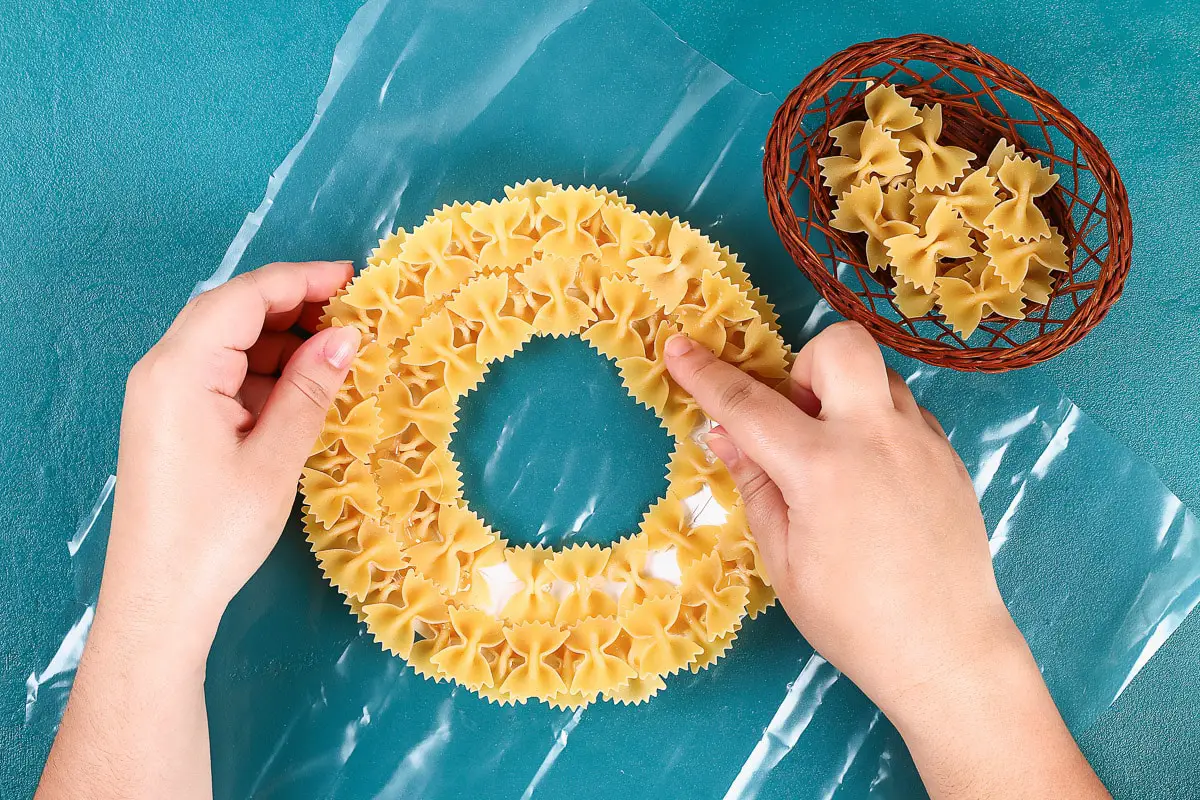
The first step in creating your farfalle pasta wreath is to form a sturdy and well-structured base. This is where your wooden wreath form comes into play. But if you are using a paper plate, like in my example, all you need to do is draw a circle and cut out the center. Easy peasy!
Adding the Farfalle
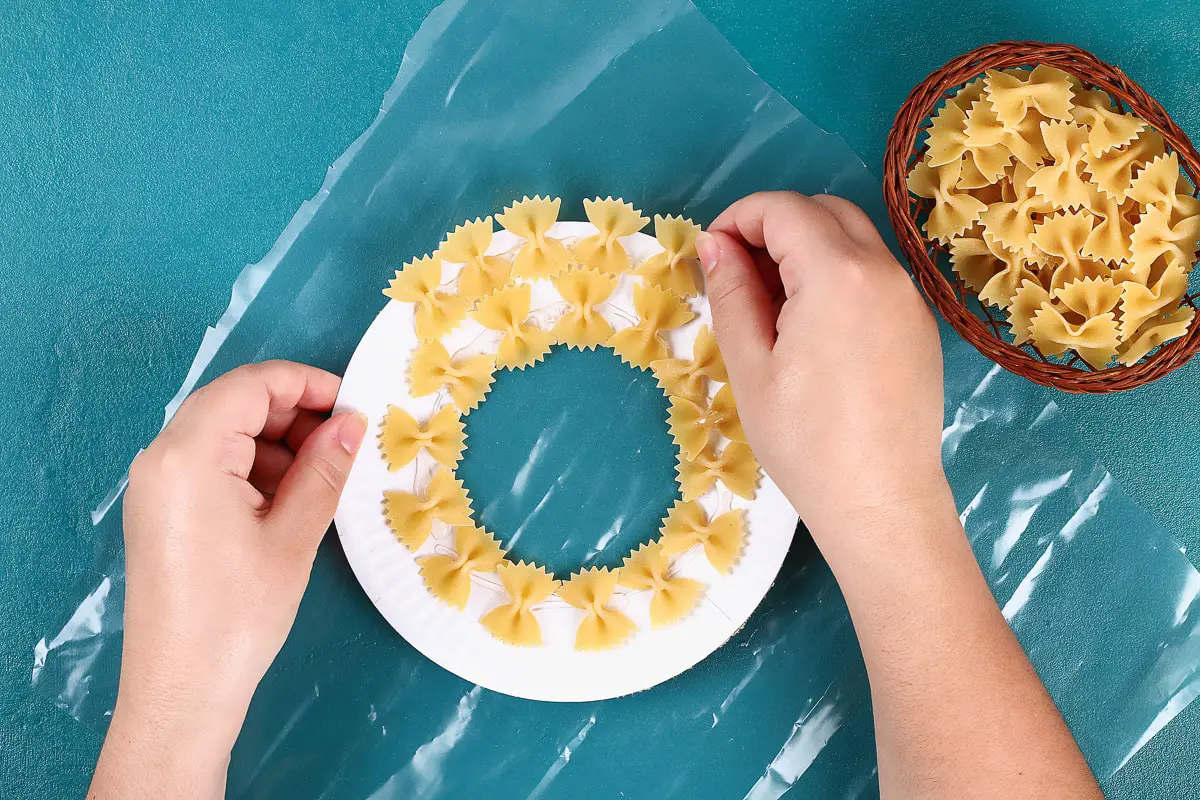
With the wreath base ready, it’s time to add the pasta. This is the fun part!
- Apply a generous amount of hot glue to the back of each farfalle pasta piece. The glue should cover the entire surface to ensure a secure attachment to the wreath form.
- Starting from the middle and working around in a circle, press the glued pasta piece onto the wreath form, holding it in place for a few seconds to allow the glue to set. Be sure to distribute the pasta pieces evenly around the wreath form to create a balanced and symmetrical design.

- Once the center is done, start the second row of pasta until you have gone completely around.
- Finally fill in the holes with more of the pasta until there is no white showing.
Once the pasta is added to the wreath, it’s time for a snack! Try our Pumpkin Whoopie Pies if you haven’t already. You should let the glue harden for at least 15 minutes before doing the final touches of the wreath.
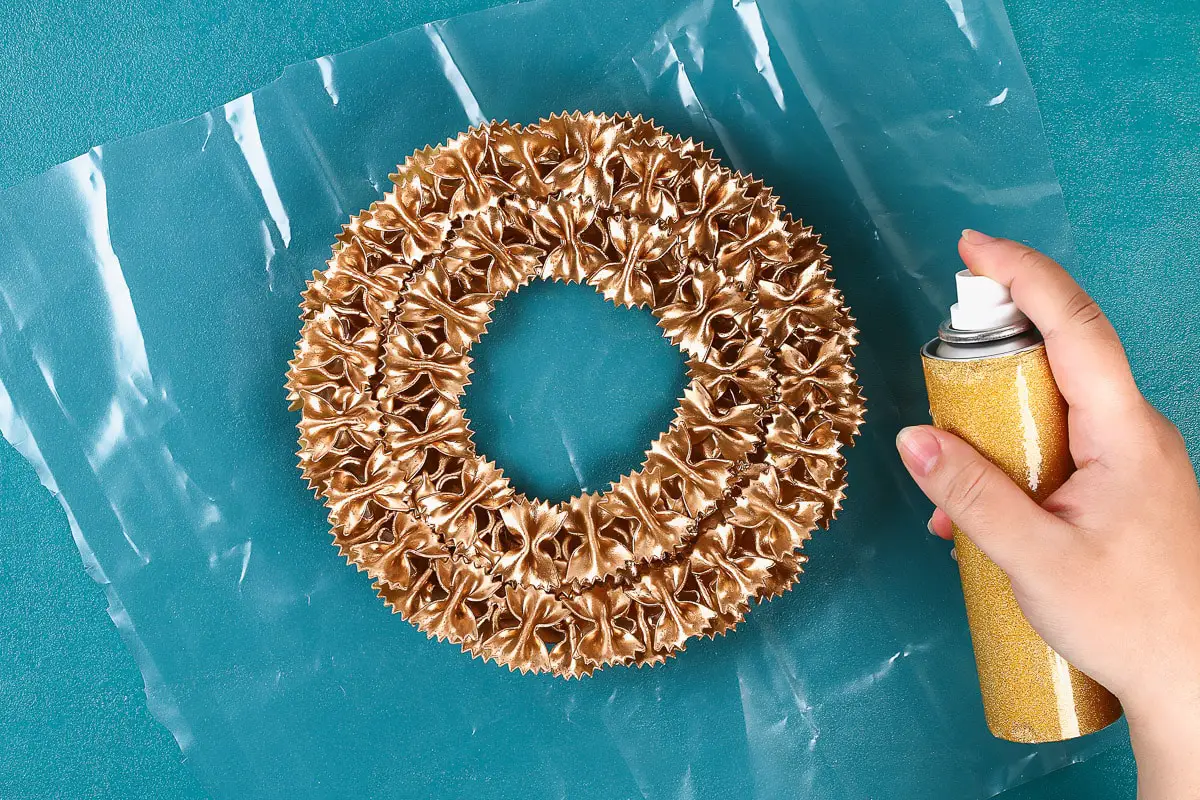
Finishing Touches for the DIY Christmas Wreath
Now that your wreath is fully covered with pasta and dry, it’s time to paint it. This step is crucial in transforming your pasta wreath into a festive decoration. Here’s how you can paint your wreath:
- Make sure to put down newspaper or an old tablecloth before spraying! Start by applying a coat of green or gold spray paint over the entire wreath (we did gold).
- Allow the paint to dry completely before applying the next coat. This ensures an even and smooth finish. Depending on the coverage, you may need to apply multiple coats of paint.
- Once the paint is dry, you can add accents or highlights using other colors. Gold, silver, or red are great options for adding a festive touch to your wreath.

Add Your Personal Touches to the Wreath
With the painting done, it’s time to customize your wreath and give it a personal touch. This is where you can let your creativity soar, adding your personal touch to make it unique. Here are a few ideas:
- Use acrylic paints to add color to your wreath. You can paint the pasta pieces in different colors to create patterns and designs.
- Add decorative elements such as ribbons, pinecones, and ornaments.
- Add bows, bells, or miniature ornaments.
- Use glitter or metallic paints to add a touch of sparkle and shine to your wreath.
Displaying Your Wreath
Your DIY Christmas wreath is now complete and ready to be displayed. Use a pretty ribbon to tie around the wreath and display. But where should you hang it? Here are some ideas:
- Front door but make sure it’s on the inside of the door, not the outside because of weather.
- Any inside door.
- On a wall
- Over a mantle
- Use it as a centerpiece.
Whichever way you choose to display your wreath, it’s going to look great! The possibilities are endless.
Care and Maintenance of Your Wreath
To keep your wreath looking its best, it’s important to take good care of it. Make sure you store your wreath in a cool, dry place when it’s not in use. This will help preserve its colors and prevent damage from humidity or heat. You could also use a protective cover or box to store it.
If it ends up dusty, use a soft brush to dust it off. And remember, even with hot glue, pieces may get knocked off but you can easily touch it up the next year and display it again and again.
More Christmas Wreath DIY Examples
If you enjoyed making this wreath and are looking for more DIY wreath ideas, Sisters Know Best has you covered! Check out this post for our top 6 DIY Christmas Wreaths. Or check out one of our absolute favorites like:
With a few simple materials and a little creativity, you can transform pasta into a beautiful holiday wreath. Whether you choose to display it on your front door, hang it on your Christmas tree, or gift it to a loved one, a pasta wreath it’s a great DIY craft!
We would love to see your finished product! Be sure to comment here or stop over on our Facebook page to show us!
Happy crafting!